Rubber Roofing Repair Kit: Your Complete Guide to Easy and Effective Roof Fixes
Introduction
Rubber roofs are known for their durability, flexibility, and resistance to extreme weather — but even the best materials need maintenance over time. Whether you own a commercial flat roof or a residential low-slope roof, a reliable rubber roofing repair kit can be your best friend when leaks, cracks, or punctures appear.
In this guide, we’ll break down everything you need to know — from what’s inside a repair kit and how to use it, to when it’s smarter to call a professional roofer. We’ll also share expert insights from Daniel Hood Roofing Systems on maintaining, inspecting, and extending the life of your roof.
What Is a Rubber Roofing Repair Kit?
A rubber roofing repair kit is a ready-to-use set of tools and materials designed to patch or seal small to moderate damage on EPDM (Ethylene Propylene Diene Monomer) or TPO rubber roofs. These kits are perfect for homeowners who want to handle minor fixes before problems grow into expensive repairs.
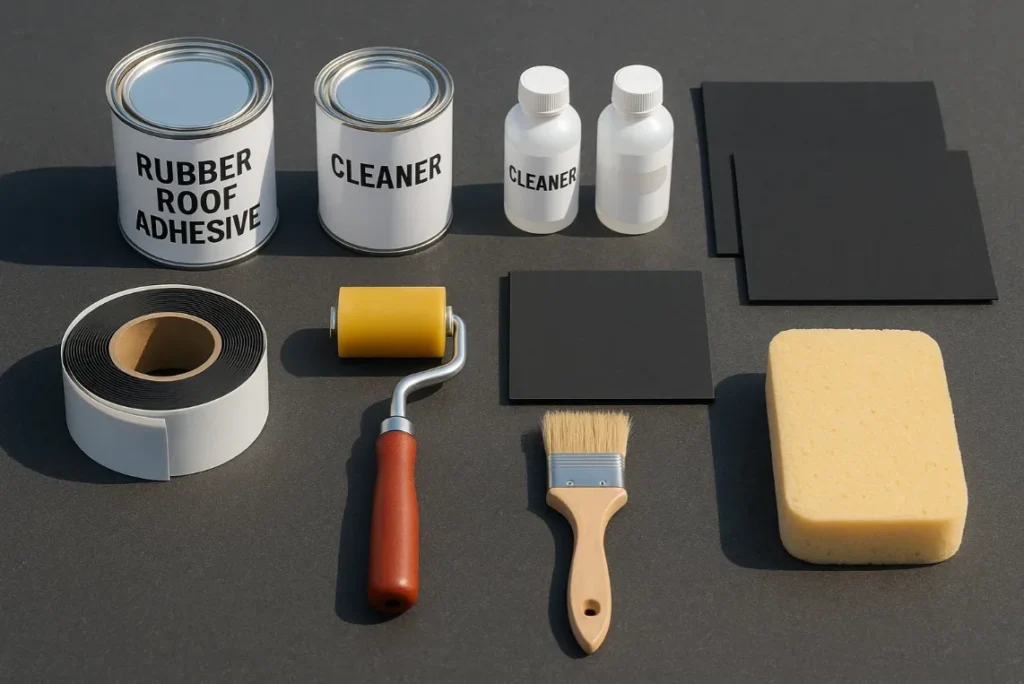
Common Contents of a Rubber Roof Repair Kit
Most quality repair kits include:
Adhesive or Primer: Helps the patch stick securely to the damaged area.
Rubber Patch Material: Often made from EPDM membrane for a weatherproof seal.
Seam Tape or Cover Strip: Reinforces the patch for long-lasting results.
Cleaning Solution: Prepares the surface by removing dirt, oil, and oxidation.
Application Tools: Rollers, brushes, or sponges to spread adhesive evenly.
When paired with the essential roofing tools every homeowner should know, these kits make small roof repairs manageable and cost-efficient.
Why Rubber Roofing Needs Occasional Repair
Even durable materials like EPDM or TPO rubber can develop issues over time due to age, weather exposure, or poor installation.
Common Causes of Rubber Roof Damage
UV Radiation: Prolonged sunlight can cause the membrane to dry, shrink, or crack.
Standing Water: Pooled rainwater may weaken seams or cause leaks.
Punctures or Tears: Falling branches or foot traffic can create small holes.
Improper Sealing: Poor adhesion at seams allows water infiltration.
Neglected Maintenance: Skipping inspections or cleaning accelerates wear.
Regular inspections can help detect these issues early. If you’re unsure what to look for, consider scheduling a thorough roof inspection with Daniel Hood Roofing Systems to spot hidden damage before it becomes costly.
Benefits of Using a Rubber Roofing Repair Kit
1. Quick and Convenient Repairs
One of the biggest advantages of using a rubber roofing repair kit is the convenience it offers. Instead of waiting days or even weeks for a roofing contractor to fit you into their schedule, you can take matters into your own hands. These kits are designed for easy, on-the-spot fixes that can be completed in just a few hours. Whether you’re dealing with a small puncture, seam separation, or a tiny leak, a repair kit allows you to handle the issue immediately—before it turns into something bigger and more expensive.
2. Cost Savings
Hiring a professional roofer for every small issue can quickly add up. A rubber roofing repair kit is an affordable alternative for handling minor roof problems yourself. You’ll only spend a fraction of what a full repair or roof replacement would cost. By addressing leaks early with a kit, you also save money in the long run by preventing structural damage, water infiltration, and mold growth. It’s a practical, budget-friendly solution for maintaining your roof’s integrity.
3. Waterproof Protection
A quality rubber repair kit usually includes EPDM (ethylene propylene diene monomer) materials—known for their superior waterproofing properties. Once applied correctly, these materials create a strong, flexible seal that resists cracking, peeling, and UV degradation. The result is a watertight barrier that keeps rain and moisture out, even in extreme temperatures or direct sunlight. This added protection ensures your home stays dry and secure all year long.
4. Extended Roof Lifespan
Regular maintenance and timely repairs are key to making your roof last. By using a rubber roofing repair kit, you can extend the lifespan of your roofing system by addressing issues before they worsen. Stopping leaks early prevents water from seeping into insulation, decking, or support structures—avoiding rot and decay. Think of it as preventive care for your roof; small, consistent fixes can keep your roofing system in good shape for many more years.
5. DIY Confidence
For homeowners who like being proactive, a rubber roof repair kit is a great way to build DIY skills. The straightforward instructions and all-in-one package make it easy to learn how to care for your roof. Completing a repair yourself not only saves money but also gives you confidence in maintaining one of your home’s most important protective systems. It’s satisfying to know you can handle small roofing problems safely and effectively without always calling in help.
Pro Tip:
For more guidance on choosing the right products for your home projects, explore our list of roofing repair products that actually work.
Step-by-Step Guide: How to Use a Rubber Roofing Repair Kit
Repairing your rubber roof doesn’t have to be complicated. With the right tools and a bit of patience, you can restore your roof’s waterproof barrier in just a few steps. Here’s a detailed guide to help you do it correctly and safely:
Step 1: Inspect the Roof
Begin by carefully examining your roof to locate any problem areas. Look for signs of damage such as cracks, blisters, punctures, or loose seams. It’s best to do this inspection on a dry day and to use proper safety gear—non-slip shoes, gloves, and a stable ladder. If you’re uncertain about identifying roof issues, you can always refer to our thorough roof inspection guide for a step-by-step approach.
Tip: Early detection helps prevent small problems from becoming costly repairs later.
Step 2: Clean the Surface
Before applying any materials, clean the area thoroughly. Use the cleaning solution that comes with your repair kit to remove dirt, dust, grease, or oxidation. Wipe it dry with a clean cloth. A spotless surface is crucial—any debris left behind can prevent the patch from sticking properly, which might cause the repair to fail over time.
Step 3: Apply Primer or Adhesive
Once the area is clean, apply a thin, even layer of primer or adhesive (included in most kits) to the damaged section. You can use a brush, roller, or sponge, depending on what’s provided. Allow the adhesive to dry until it feels tacky—this is the ideal consistency for a strong bond between the rubber membrane and the patch.
Step 4: Cut and Apply the Patch
Next, trim the rubber patch material so it extends at least 2 inches beyond all sides of the damaged spot. This overlap ensures complete coverage and prevents water from sneaking in around the edges. Carefully position the patch and press it down firmly. Smooth out any air bubbles using a hand roller or your gloved hands, working from the center outward for an even seal.
Step 5: Seal and Reinforce the Repair
To make sure your repair lasts, use seam tape or a cover strip to reinforce the patched area. Press it firmly and roll over it several times to ensure maximum adhesion. This step strengthens the waterproof seal and helps the repair withstand UV rays, heat, and freezing temperatures.
Step 6: Allow Proper Curing Time
Finally, let the repaired area cure. Most rubber roofing adhesives and sealants require at least 24 hours before being exposed to heavy rain, foot traffic, or direct sunlight. Avoid disturbing the patch during this period to allow the materials to bond fully and achieve a watertight finish.
While rubber roofing repair kits are perfect for small leaks and surface damage, they’re not meant for extensive or structural roof problems. If your roof has multiple leaks, sagging areas, or widespread wear, it’s best to contact an experienced roofing professional.
The experts at Daniel Hood Roofing Systems can inspect your roof, determine the best repair approach, and ensure your roof remains safe, durable, and up to code.

Choosing the Right Rubber Roofing Repair Kit
Not all roofing repair kits are created equal. Selecting the right one for your roof ensures a strong, long-lasting repair and helps prevent future leaks. Here are the key factors to consider when making your choice:
Material Compatibility
Different roofing systems require specific repair materials. For example:
EPDM Roofs: Use EPDM-compatible patches and adhesives to ensure proper bonding.
TPO Roofs: Look for kits labeled TPO-compatible, as these are designed to adhere to thermoplastic membranes.
Using the wrong material can lead to poor adhesion and reduced lifespan of your repair, so always check compatibility before purchasing.
Weather Resistance
Your roof is exposed to sun, rain, and temperature fluctuations year-round. Choose a kit with UV-resistant and waterproof adhesives to protect against cracking, peeling, or water intrusion. A weather-resistant kit ensures your repair can withstand the elements and continue protecting your home for years.
Ease of Use
For DIY homeowners, a kit with clear, step-by-step instructions is essential. Some kits include pre-cut patches, application tools, and easy-to-follow guides, making the repair process straightforward—even if it’s your first time working on a roof. The easier the kit is to use, the more likely your repair will succeed.
Durability
Not all rubber roofing repair kits are equally long-lasting. Look for products with proven performance and long warranties, which indicate higher-quality materials and reliable results. A durable repair means fewer future headaches and lower maintenance costs.
Coverage Area
Before buying, check the kit’s coverage area to make sure it’s enough for your intended repair. Some kits are designed for minor patches, while others provide enough material for multiple repairs or larger leaks. Choosing a kit that matches your needs avoids wasted materials or multiple trips to the store.
Expert Guidance
If you’re unsure which kit is best for your roof type or current condition, the experts at Daniel Hood Roofing Systems can help. They can recommend the ideal product for your specific situation, ensuring a secure and effective repair that protects your home long-term.
When to Use a Rubber Roofing Repair Kit vs. Calling a Professional
DIY Fixes Are Ideal For:
Small punctures or minor leaks.
Loose seams or flashing issues.
Early signs of aging or weather wear.
Call a Professional For:
Large or recurring leaks.
Damage near roof edges, vents, or drains.
Old or severely deteriorated membranes.
Emergency situations caused by storms or debris.
For urgent needs, Daniel Hood Roofing offers emergency roof repair services to restore protection fast.
How to Maintain Your Rubber Roof After Repair
A rubber roof can last 30–50 years with proper maintenance. Here are key steps to extend its life:
1. Schedule Regular Inspections
Twice-yearly inspections—especially after severe weather—help identify small issues early. Book a roof inspection service for professional assessment.
2. Keep the Roof Clean
Dirt, leaves, and debris trap moisture that weakens seams. Our roof cleaning services can safely restore your roof’s condition.
3. Check for Storm Damage
Even though tornadoes are rare, they’re real. Learn how to protect your roof from high winds in our guide: Tornadoes Are Rare But Real.
4. Address Rust or Corrosion
If your rubber roof connects to metal panels, inspect them regularly. You might also be interested in our articles on metal roofing repair secrets and through-fastened metal roofing systems for hybrid roof maintenance tips.

Rubber Roofing vs. Metal Roofing: Which Is Easier to Repair?
Rubber Roofing Advantages:
Easy DIY patching using repair kits.
Flexible material resists cracking.
Affordable and quick to fix.
Metal Roofing Advantages:
Long lifespan and high durability.
Resistant to fire and extreme weather.
Low maintenance with proper coating.
However, if your home has both materials (common in Tennessee), you’ll benefit from expert guidance by Tennessee roof repair contractors who understand both systems inside and out.
Tips for Safe DIY Roof Repairs
Even small rubber roof repairs require more than just the right materials—they demand careful attention to safety and proper technique. A slip or misstep can lead to serious injury, so it’s important to approach every repair with caution, plan your work, and use the right equipment. Taking the time to follow safety practices not only protects you but also ensures your repair is done correctly and lasts longer.
Safety Reminders
Use Non-Slip Shoes: Roofs can be slick even when dry.
Avoid Repairs in Bad Weather: Wet conditions increase the risk of falls.
Use Proper Equipment: Gloves, safety harnesses, and stable ladders are must-haves.
Don’t Overreach: Work in comfortable sections and reposition your ladder as needed.
Whether you’re patching a minor leak or reinforcing a seam, always prioritize safety over speed. If you feel unsure about working at heights or tackling a repair on your own, it’s wise to leave the job to professionals. The experienced team at Daniel Hood Roofing Systems can handle residential roof repairs safely and efficiently, giving you peace of mind and a durable result that protects your home for years to come.
Expert Recommendation: Combine DIY Kits with Professional Maintenance
A rubber roofing repair kit is a valuable investment for homeowners who want to stay proactive. But pairing DIY care with expert maintenance ensures your roof remains structurally sound for decades.
Daniel Hood Roofing Systems provides comprehensive solutions, from inspections and cleaning to standing seam metal roofing installations and full replacements.
When you use a repair kit for small leaks and rely on professional contractors for complex repairs, you get the best of both worlds — affordability and long-term protection.
Final Thoughts
A rubber roofing repair kit can help you manage small issues before they become big problems. With the right materials, regular maintenance, and expert backup, you can protect your roof from leaks, UV damage, and costly repairs.
If you’re unsure whether a repair kit will solve your issue, or if you’d like an expert opinion, reach out to Daniel Hood Roofing Systems today. Our roofing team serves Tennessee homeowners with trusted inspections, fast repairs, and honest advice to keep your home safe year-round.
Protect your roof before the next storm hits.
Contact Daniel Hood Roofing Systems today to schedule a professional inspection or discuss your rubber roofing repair needs with our experienced team.